Wednesday, August 14, 2013

Good day,
We had our monthly game of the Kennesaw Mountain Wargamers Saturday and it was an very enjoyable WWII skirmish game put on by Jim S.   We are using a set of Jim's rules that are under development and will hopefully be published by TFL once completed.   The game is a nice combination of detail and simplicity.  We did recommend one change which Jim agreed would make sense and this had to do with a rule that allowed an officer to direct rifle fire at a single target/target area.  It turned out that our game showed that this made a platoon of British riflemen to be too powerful.   More powerful as it turned out than a German MG42 that was set up with bi-pod and in hard cover etc.   I will post the photos and briefly describe what was happening.

The scenario was a French and British counterattack to retake an important bridge that had been captured by a small German force.   The Germans were to hold the bridge for advancing mechanized units.   The first shots are of the battlefield before deployment and then a couple showing some of the Germans deployed in positions.

 The allies will be advancing down both the road entry on the left (French) and the road entry on the right far end of the table as shown below.  Might get a little warm for the Germans....


The village held by the Germans that was on both sides of the river consisted of 2 soft cover (wood) and 2 hard cover (stone) buildings.  There were numerous light woods, fenced fields, knee to waste high wheat, grass fields and some rough rocky terrain.  
Sounds like the German's are sitting pretty right?  Not exactly, they had to defend attacks that were coming down both of the roads.   The Germans had 2 platoons each with a MG42, plus there was a light mortar and an anti-tank rifle in support.  The quality of the troops were randomly selected.   One Green and one Regular for the Germans.  The French had 1 Green and 1 Regular while the Brits had 2 regular platoons.   Jim and Mark played the Germans while Greg, John and I played the "good guys".  Well "good guys" as I that was the side I was playing on of course! LOL
Jim's group faced the French advance while Mark had to contend with the British advance.

In addition the French had a true light tank (AMR I think) with a light machinegun and a 60mm mortar in support.  The Brits had a 6 pounder with Bren transport for support.

Jim's rules allow for each unit to roll for a variable number of command points that can then be allocated to each figure.  When a unit is fresh it will move easily.   Depending on how many command points there are in a particular turn for a unit.  Points are then deducted from the unit total for wounded, dead or stun markers (similar to a pinned marker in other rules).  A non wounded infantryman in command can be provided with a maximum of 3 command points.  Each point allows on action, except for firing which is limited to once per turn it is possible to move for all 3 points or a combination of actions like stand up (1 action), move (2 actions) and then go prone (no cost).  You can use points to spot, aim and fire at 1 action per.  All of the costs are spelt out on the cheat sheets that Jim provides.  When you fire you determine if you "hit" the target and then roll to see if the target is stunned, light wound, heavy wound or dead.

The French advancing, my regular platoon is closest heading into the light woods with my support mortar advancing to a position on the road.   Greg's green platoon and the light tank are advancing along the road.


                                          Above:German infantry preparing to fire on the Brits.
 
You will notice that all of the French are bunched together, a real gamble and potentially disastrous formation.  This was the quickest way to advance and keep all of the infantry in command.  Command distance was only 6 inches.  The British on the right flank are obviously aware of the dangers of such a formation and are dispersed as they advance behind the cover offered by buildings and terrain.  The 6 pounder deployed in the center of the British line.
 
I somehow managed not to get a photo of the British left flank, they were slightly bunched to allow all of the platoon to be in command.  The left flank advanced slowly in the open by making a short move and going prone to minimize hits. 
Above German's hiding behind the wheat, but will it do them any good?
Nope.

Not only did Greg's tank stop to maximize its abilities it managed to spot the Germans behind the wheat and then put a light and a heavy wound on two of the men while also adding a couple of stun markers.  Stun markers can be removed at the first of every turn by spending one command point to remove one stun marker.  That mortar is mine and setting up on the road in an attempt to support Greg's advance.  The mortar team managed to KIA one of Jim's Germans that the tank did not and then they became a great target for a MG42 that was hidden in one of the buildings.  After that there was no mortar support!

My French attempting to sneak through the woods, still bunched together.  Wonder what will happen?
No big surprises here!  Jim dropped a mortar round in the middle of the group and Mark opened up with rifles and a M42.  Ouch.   Good news, well if there is any, would be that I pinned Marks infantry on my side of his position.

Another shot of Greg's advance, it got off to a slow start but that would change. 
 

Greg's light tank and infantry advance.  The infantry takes cover behind one of the buildings.
The tank trades shots with Mark in the stone building that is to my front.   Mark has an anti-tank rifle that at this range should have knocked out the tank.  Mark achieved about 3 hits on the tank but evidently they were only glancing blows as none of the damaged or destroyed the tank.  Luckily for the tank Mark rolled an out of ammo for the anti-tank rifle.  Everyone started calling it a tiger tank as it appeared to rule the game table at this point.   LOL
The view from my infantry positions of the stone house where Mark's infantry had me pinned down.

Above are two photos of John's Brits.  The right flank had captured the first building and were taking up positions.  The figures in the garden are prone though it appears there are a couple of markers on them.  The first of the photo shows John's left flank, once again the guys are prone and not casualties.


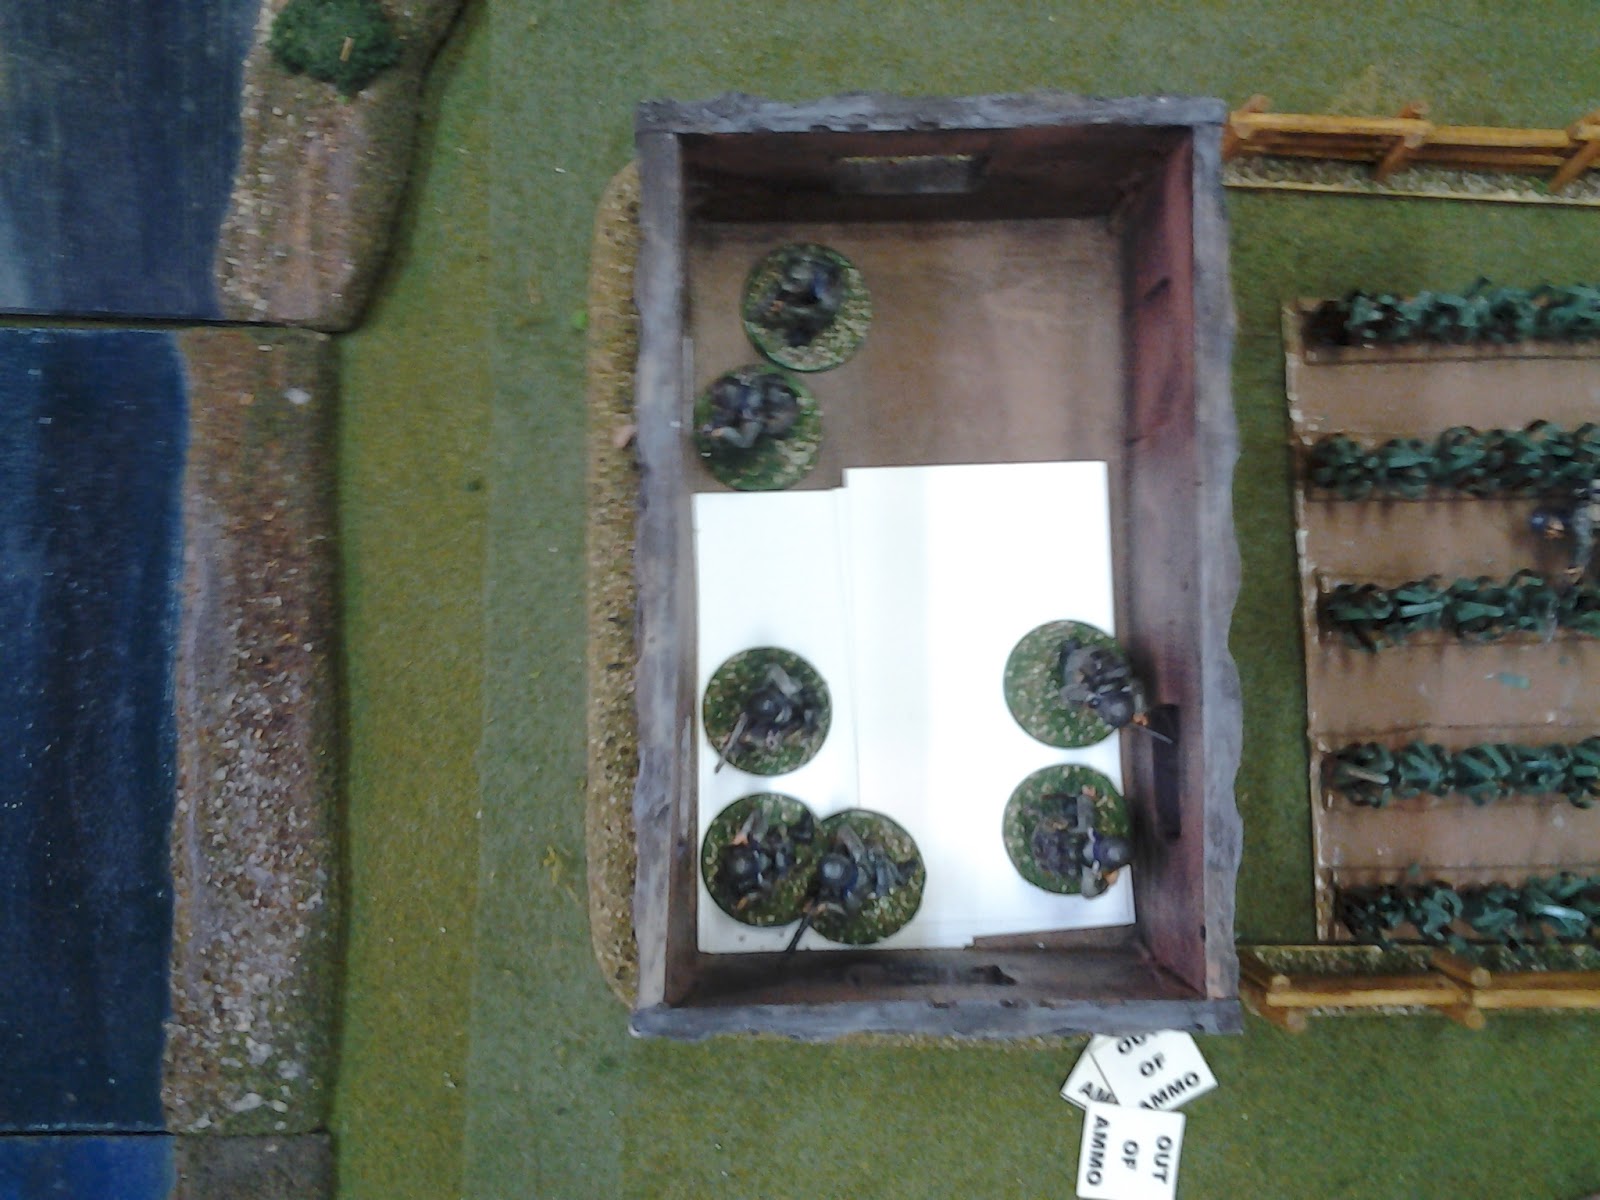
Above are the remaining German's holed up in two of the buildings.  Mark's stone house is still very strong with over half of his infantry in it.   Jim is down to 3 infantrymen plus the mortar.  Jim will most likely not pass the next morale test that he might have to take.
 
As the anti-tank rifle was out of ammo and John and Greg making headway with their troops we decided to call the game with an allied victory. 
 
Our game next month with be Maurice.

Wednesday, July 31, 2013

Good Tuesday morning, here at least.  I clicked the odometer over for another year and while getting older is not cracked up to be great things are looking good.

I spent the past week or so pulling out terrain pieces and either repairing, making new and even finding some long lost pieces.

The first motivation to update terrain pieces came from a huge set of purchases from the national model rail road convention that was held here a couple of weekends ago.  Anyone with a sharp eye will see that not only did I purchase additional terrain items, shown on the left, but also some HOn3 narrow gauge equipment and buildings for the model railroad that is tucked away in boxes.   That may change....

I then pulled out some "Christmas" trees that I picked up fairly cheap at the local Home Depot DYI.
As they are all flocked with "snow" I had to touch of 60 odd of them up with a highlight of dry/wet brushed spring green.   I added those to 20 I had done a few years ago.  Work in progress followed by all of the completed trees.

I decided to complete these trees as we have been playing a fair amount of skirmish type games and some of my existing nice trees get in the way and sometimes become casualties.   These trees should take any amount of fire and survive.


My long lost shore battery and star fort for our sailing ship games.  Shown with one of my Valiant ships.  We use Ship of the Line rules and have a great time when we play these.   It might be time to think about putting one of these games on in the near future.

Thursday, July 25, 2013

Saturday's game was a big success though we had to modify our original plans a little.  We were not able to run Jim's rules but luckily Daniel had brought along his copy of Bolt Action and we also had enough figures between him and John to set up our first game with these rules.  This was a late war battle we set up on the fly where German Fallschirmjagers  were defending vs. a British attack.

Overall the rules worked pretty well.  We made a few errors, like close assaults.  We played it that the assaulting troops could only roll to match the number of defenders which led to a superior platoon being destroyed by a defender very quickly.  We should have allowed the units to roll for all of their figures involved in the close assault.  The end result may have been the same but our version indicated that you never wanted to close assault!  This was of course wrong.

We also played the rules for unit actions when they were pinned.  We did not make pinned units pass an order test to move etc.  This makes some of the things I have read about Bolt Action make more sense.  I had read that you really needed to roll off your pins or your units would become next to useless.  If we had played this rule more correctly we would have found units to have not been able to execute orders nearly as readily as they did.

Thanks to Daniel for running the game on short notice.  We decided that we would be willing to play these rules again at some point in the future.   When we do all of those who own the rules be sure to have familiarized themselves with the rules so we minimize the errors as we play.  Considering this was an unplanned pick up game with a set of rules none of us had played it went very well.

I will attempt to give a AAR report on the game along with some photos.


These are a few of the over all shots of the table at the beginning of the game.  You can see a few Germans skulking around n the woods.   The Germans were defending the long wooded ridge and a line that stretched on to a ruined building, a barn and a series of woods.
The next shots are of the British starting their attack with 2 Bren carriers, support mortar (2 inch I believe),infantry and a 6 lb gun with carrier.


 The next photos show Germans in position and advancing on the right flank and into the wooded ridge.   The Brits start to take hits on the right flank from the wooded ridge.  The German MGs start to fire.   The German assault on the British left fails, most likely due to our misunderstanding the close assault rules.  The outnumbered Brits destroyed the German unit as an effective fighting unit.
The British 6 pounder searches for a target, decides that the reports of a German armored car on their left flank dictate limbering up and moving to that flank.   The German armored car, sorry no photo, ended up holding down the German right flank after the infantry on that flank was destroyed in the above mentioned assault.


The British attack on their right flank starts to stall due to hits and pin markers but they are able to eventually destroy the few Germans to their front and just as they are ready to start moving forward again the only reserve German figures take up positions on the ridge.   The British infantry advancing, sneaking?, along the road and the hedge with support of their Bren gun appear to be ready push through the enemy lines when 2 hidden MGs open up on them and the advance goes to ground.  The MGs were the only German units on the right center of their line as the infantry had shifted left to cover that flank as mentioned earlier.
The British pounder was not able to complete its redeploy before we called the game so neither the gun nor the German AC were able to really engage each other.
The British had about 6 or so less casualties than the German Fallschirmjagers but they had been  hit hard enough that it was safe to assume their attack would go no further.
I am sure our next Bolt Action game will prove to be an even better game with some of our rules questions cleared up.   We will also have more troops available as not all of the available figures were brought to the game.
 
A special thanks to all that attended.  In no special order this included:  Josh, John, Greg, Daniel, Rob and Titch.   Hopefully I did not forget anyone.
 
Our game in August will be the postponed WWII early war scenario with the French counter attacking the Germans.  The date for this game will be August 10th, 2013 and should provide an interesting comparison between Jim's rules and Bold Action rules.